Creating a WhatsApp Chatbot from Documents using ChatGPT API: A Step-by-Step Guide
Having a chatbot to automate customer support & engagement, especially on WhatsApp, is crucial in today's digital age. ChatGPT API enables the easy creation of natural language-understanding chatbots that generate responses based on your data.
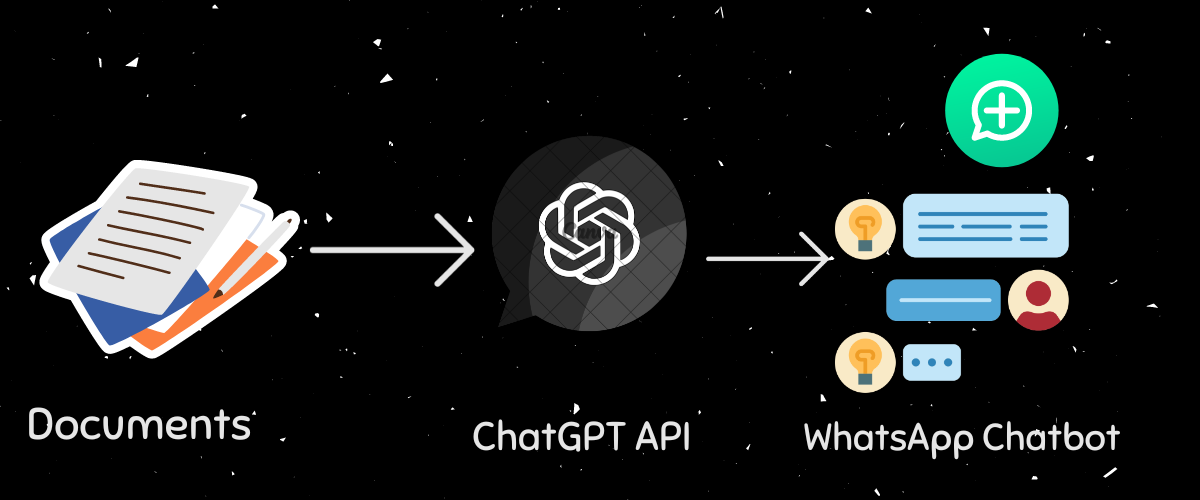
With the ability to create your own chatbot from documents, you will need to put it out in the world to see it in action. In this article, we are going to create a bot and deploy it in WhatsApp.
In the post-chatbot form document using chatGPT, we were able to create a chatbot from our documents. Now we are going to make a bot more useful by making it available on various platforms. Let's go with one of the popular social platforms, WhatsApp.
We are going to modify a bit our previous code to accomplish this amazing feature using heyoo wrapper.
Basic Set up
The basic setup of the WhatsApp chatbot is obtaining credentials. To get your WhatsApp cloud API creds, please follow the instructions at whatsapp cloud api set up. With your phone_number_id and whatsapp_token, we are ready to integrate our bot with WhatsApp.
Getting to work
It's time to get our hands on work, we are going to make minor modifications to the previous code. We shall set up a webhook to receive WhatsApp message updates. There are several ways you can set up a webhook. I will be going through with ngrok and replit
Ngrok
With ngrok everything is done on your local machine. So we have to install all our packages on the local machine.
Steps:
- Install packages
At this step, it is assumed that you already have the packages discussed in the previous article installed.
| package | usage |
|---|---|
| heyoo | Enables us to work with WhatsApp cloud API |
| Flask | Provides route listening to webhook |
pip3 install --upgrade heyoo
pip3 install flask2. Set up .env
We are going to create .env file to hold our credentials from WhatsApp and OpenAI. Using your favorite text editor, create a .env file in the project directory.
In the file add the following. Please place your keys here. Use WhatsApp credentials obtained at getting credentials
openai_key ="your open ai key"
phone_number_id="whatsapp phone number id"
whatsapp_token="whatsapp token"
Here is the basic structure of our project so far. You will have to put your documents in the `documents` folder
 chatbot
   ├── documents
   │   ├── doc_1.txt
   │   ├── doc_2.txt
   │   └── doc_3.txt
   └── main.py
   └── .env
3. Import and initialize objects
import os
import logging
from heyoo import WhatsApp
from dotenv import load_dotenv
from flask import (
  Flask,
  request,
  make_response,
)

#laod .env
load_dotenv()

messenger = WhatsApp(
  os.environ["whatsapp_token"],
  phone_number_id=os.environ["phone_number_id"] )

app=Flask(__name__)
4. Create a webhook route
Using Flask we are going to add a webhook route to receive message updates.
@app.route("/", methods=["GET", "POST"])
def hook():
  if request.method == "GET":
    if request.args.get("hub.verify_token") == VERIFY_TOKEN:
        logging.info("Verified webhook")
        response = make_response(request.args.get("hub.challenge"), 200)
        response.mimetype = "text/plain"
        return response
    logging.error("Webhook Verification failed")
    return "Invalid verification token"

  # get message update..
  data = request.get_json()
  changed_field = messenger.changed_field(data)

  if changed_field == "messages":
    new_message = messenger.get_mobile(data)
    if new_message:
      mobile = messenger.get_mobile(data)
      message_type = messenger.get_message_type(data)

      if message_type == "text":
        message = messenger.get_message(data)
        response=respond(message)
        logging.info(f"\nAnswer: {response}\n")
        messenger.send_message(message=f"{response}",recipient_id=mobile)
      else:
        messenger.send_message(message="Please send me text messages",recipient_id=mobile)

  return "ok"
5. complete the code snippet
Here is the complete code for our chatbot.
import os
import logging
from dotenv import load_dotenv
from heyoo import WhatsApp
from langchain import OpenAI
from flask import (
  Flask,
  request,
  make_response,
)
from llama_index import (
  GPTSimpleVectorIndex,
  SimpleDirectoryReader,
  LLMPredictor,
  ServiceContext,
  QuestionAnswerPrompt,
)

# load env data
load_dotenv()

# messenger object
messenger = WhatsApp(
  os.environ["whatsapp_token"],
  phone_number_id=os.environ["phone_number_id"] )

#Flask app
app=Flask(__name__)


VERIFY_TOKEN = "30cca545-3838-48b2-80a7-9e43b1ae8ce4"

# Logging
logging.basicConfig(
    level=logging.INFO, format="%(asctime)s - %(name)s - %(levelname)s - %(message)s"
)

# open ai key
os.environ["OPENAI_API_KEY"]=os.environ["openai_key"]

# add predictor

llm_predictor = LLMPredictor(llm=OpenAI(temperature=0, model_name="text-davinci-003"))
# # load document

documents = SimpleDirectoryReader("documents").load_data()

service_context = ServiceContext.from_defaults(llm_predictor=llm_predictor)
index = GPTSimpleVectorIndex.from_documents(documents, service_context=service_context)

# save index
index.save_to_disk("index.json")

# load saved index
index = GPTSimpleVectorIndex.load_from_disk("index.json")


#custom respond function

def respond(query_str:str):
  QA_PROMPT_TMPL = (
    "Context information is below. \n"
    "---------------------\n"
    "{context_str}"
    "\n---------------------\n"
    "Given this information, answer from context, be polite and generate short and clear responses. please answer the question: {query_str}\n"
  )

  QA_PROMPT = QuestionAnswerPrompt(QA_PROMPT_TMPL)

  response = index.query(query_str, text_qa_template=QA_PROMPT)

  return response

#webhook route
@app.route("/", methods=["GET", "POST"])
def hook():
  if request.method == "GET":
    if request.args.get("hub.verify_token") == VERIFY_TOKEN:
        logging.info("Verified webhook")
        response = make_response(request.args.get("hub.challenge"), 200)
        response.mimetype = "text/plain"
        return response
    logging.error("Webhook Verification failed")
    return "Invalid verification token"

  # get message update.. we want only to work with text only
  data = request.get_json()
  logging.info("Received data: %s",data)
  changed_field = messenger.changed_field(data)

  if changed_field == "messages":
    new_message = messenger.get_mobile(data)
    if new_message:
      mobile = messenger.get_mobile(data)
      message_type = messenger.get_message_type(data)

      if message_type == "text":
        message = messenger.get_message(data)
        response=respond(message)
        logging.info("\nResponse: %s\n",response)
        messenger.send_message(message=f"{response}",recipient_id=mobile)
      else:
        messenger.send_message(message="Please send me text messages",recipient_id=mobile)

  return "ok"


if __name__ == "__main__":
    app.run(port=5000,debug=True)
6. Let's run the code
- After setting everything in place, let's run our Python script.
python3 main.py- Next, we are going to run ngrok
./ngrok http 5000- Finish up.
After running the command, you will have to copy the URL ngrok provides. The URL looks like https://xxxxxxxxxxx.ngrok.io.
With the provided URL, follow simple steps at Setting whatsapp webhook.
Open, copy the VERIFY_TOKEN--> Paste into verify token in your WhatsApp cloud --> verify and save.
We are heading a the best part of this journey. Just take time to subscribe to message topic. When done, you are good to go... Fire up your bot in Whatsapp by sending a text.
Deploying WebHook with Replit
Steps
- Log into your Replit account.
- Fork this repo deploying chatbot form document in whatsapp
- Create secret keys
Navigate to Tools(in replit)--> Secrets to create environment variables. Use WhatsApp credentials obtained at getting credentials
| Secret key | Description |
|---|---|
phone_number_id |
WhatsApp cloud phone ID |
WhatsApp_token |
Your WhatsApp token |
openai_key |
Your OpenAI API key |
4. Run the script
After creating the secret keys, run your main.py. A small preview window will open up with a URL that looks like https://{your repl name}.{your replit usermae}.repl.co.
With the url, follow simple steps at Setting whatsapp webhook.
5. Final touches
Go into your REPL, copy the VERIFY_TOKEN --> Paste into verify token in your WhatsApp cloud --> verify and save.
We are reaching at a good point with the setup. Let's subscribe to message topic. When done, you are good to go... fire up your bot in Whatsapp by sending a text.
Setting WhatsApp webhook
Navigate to your WhatsApp cloud account --> configuration --> edit --> then paste the URL into the callback URL.
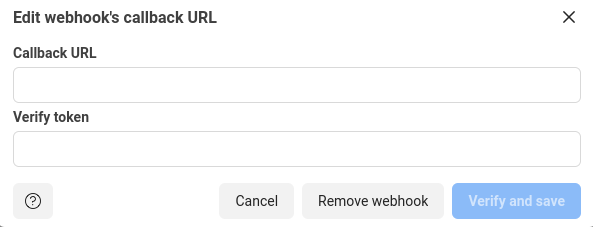
Then copy VERIFY_TOKEN from the code into the verify token field. Here you can use your own random tokens.
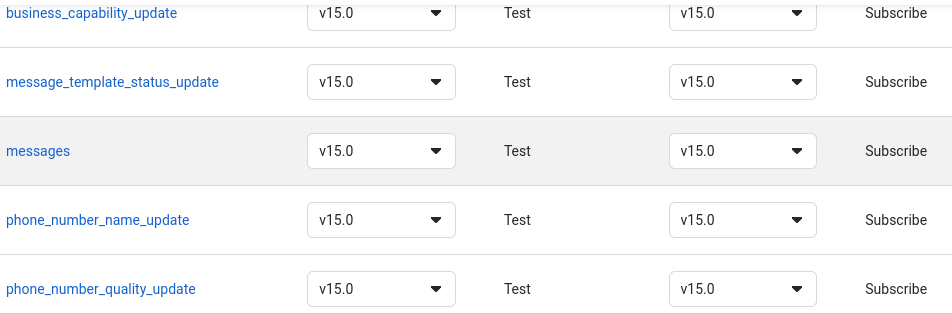
Subscribe to webhook field
After verifying and saving the WhatsApp webhook, navigate to the webhook fields --> click manage to subscribe to message topic.
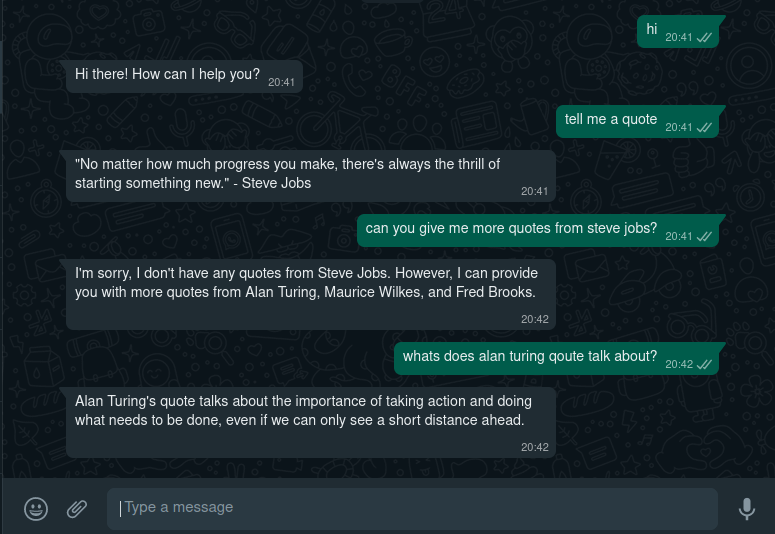
Testing our bot
I created a simple bot with a few quotes. Here is what the responses looked like.
Conclusion
We used heyoo in this tutorial to launch our chatbot in WhatsApp. Python and several potent AI technologies were used to generate it from documents. This chatbot may be used on Telegram as well. How to run the bot in Telegram will also be covered in a future blog.
Need a solution like this specific to your business ? Send us an email at info@neurotech.africa or contact us at page